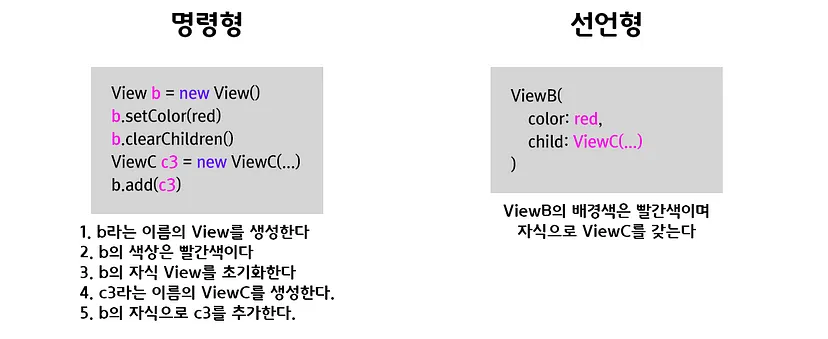
명령형 프로그래밍과 선언형 프로그래밍
두 프로그래밍 방법은 뭐가 다를까!
2023-06-15
명령형 프로그래밍과 선언형 프로그래밍
먼저 아래의 코드는 배열을 인자로 받아서 요소들을 2씩 곱해서 반환하는 것이다.
function double(arr) {
  //배열을 받아서 요소들을 2씩 곱해서 반환
  let results = [];
  for (let i = 0; i < arr.length; i++) {
    results.push(arr[i] * 2);
  }
  return results;
}
// double([1,2,3,4]) => [2,4,6,8]

console.log(double([1, 2, 3, 4, 5]));
//[2,4,6,8,10]
이 코드를 선언형 프로그래밍에 가깝게 만들어보자.
배열에 있는 값을 어떻게 처리 할 것인가?에서 벗어나서, map이라고 정의된 규칙에 의 해, 어떠한 과정을 거쳐서 만들거냐, 무엇을 원하느냐가 더 중요해 진다.
function double(arr) {
  return arr.map((number) => number * 2);
}
만약 앞서 배열을 받아서, 배열의 요소를 2배씩 늘려서 반환하는 선언형 프로그래밍코 드에
- 배열이 아닌 문자열이 들어간다면 어떻게 처리해야 할까?
위의 경우 추가적으로 코드를 변경할 수 밖에 없다.
function double(arr) {
  let results = [];
  //숫자인 경우를 판별하기 위해 typeof연산자를 추가로 사용

  for (let i = 0; i < arr.length; i++) {
    if (typeof arr[i] === 'number') {
      results.push(arr[i] * 2);
    }
  }

  return results;
}
그럼 위 요구사항을 선연형 프로그래밍 방식으로 적용해보자.
function double(arr) {
  //숫자만 뽑고 숫자만 2씩 곱한다.
  return arr
    .filter((params) => typeof params === 'number')
    .map((number) => number * 2);
}
또 다른 예시를 살펴보자. 요구사항은 털 색이 까만색이 포함되어 있으면서 귀가 접히 지 않은 고양이들을 뽑는 것이다. 먼저 명령형 프로그래밍 방식으로 이를 구현하면 다 음과 같다.
const data = [
  {
    name: '동글',
    colors: ['yellow', 'white'],
    age: 7,
    ear: 'folded',
  },
  {
    name: '초코',
    colors: ['brown'],
    age: 3,
    ear: 'unfolded',
  },
  {
    name: '마루',
    colors: ['black', 'brown'],
    age: 5,
    ear: 'unfolded',
  },
  {
    name: '뽀삐',
    colors: ['orange', 'white'],
    age: 2,
    ear: 'folded',
  },
  {
    name: '루시',
    colors: ['gray', 'white'],
    age: 4,
    ear: 'folded',
  },
  null,
];

function filterCats(cats) {
  let results = [];

  for (let i = 0; i < cats.length; i++) {
    const cat = cats[i];
    if (cat && cat.colors.includes('black') && cat.ear === 'unfolded') {
      results.push(cat.name);
    }
  }

  return results;
}

const filterdCats = filterCats(data);
이제 이 코드를 선언형 프로그래밍 방법으로 바꿔보자.
const data = [
  {
    name: '동글',
    colors: ['yellow', 'white'],
    age: 7,
    ear: 'folded',
  },
  {
    name: '초코',
    colors: ['brown'],
    age: 3,
    ear: 'unfolded',
  },
  {
    name: '마루',
    colors: ['black', 'brown'],
    age: 5,
    ear: 'unfolded',
  },
  {
    name: '뽀삐',
    colors: ['orange', 'white'],
    age: 2,
    ear: 'folded',
  },
  {
    name: '루시',
    colors: ['gray', 'white'],
    age: 4,
    ear: 'folded',
  },
  null,
];

function filterCats(cats) {
  return cats
    .filter(
      (cat) => cat && cat.colors.includes('black') && cat.ear === 'unfolded'
    )
    .map((cat) => cat.name);
}
UI를 만드는데 선연형 프로그래밍이 더 효과적인 이유
선언형 UI는 상태와 같이 무엇을 랜더링할지 정의해주는 것을 의미한다.
명령형과 비교해 더 작은 코드로 직관적인 UI를 만들 수 있다.
먼저 주어진 요구사항은 화면에 버튼을 3개 넣고, 버튼을 클릭하면 삭선이 그어지도록 만드는 것이다.
- 버튼을 3개 만든다.
- 만든 버튼을 화면에 그린다.
- 버튼을 클릭하면 삭선이 그려진다.
const $button1 = document.createElement('button');
$button1.textContent = 'Button1';

const $button2 = document.createElement('button');
$button2.textContent = 'Button2';

const $button3 = document.createElement('button');
$button3.textContent = 'Button3';

//방법 1
document.querySelectorAll('button').forEach(($button) => {
  $button.addEventListener('click', (e) => {
    const { target } = e;
    if (target.style.textDecoration === 'line-through') {
      target.style.textDecoration = 'none';
    } else {
      target.style.textDecoration = 'line-through';
    }
  });
});

//방법 2
const $main = document.querySelector('#app');
$main.appendChild($button1);
$main.appendChild($button2);
$main.appendChild($button3);

$button1.addEventListener('click', () => {
  if ($button1.style.textDecoration === 'line-through') {
    $button1.style.textDecoration = 'none';
  } else {
    $button1.style.textDecoration = 'line-through';
  }
});

$button2.addEventListener('click', () => {
  if ($button2.style.textDecoration === 'line-through') {
    $button2.style.textDecoration = 'none';
  } else {
    $button2.style.textDecoration = 'line-through';
  }
});

$button3.addEventListener('click', () => {
  if ($button3.style.textDecoration === 'line-through') {
    $button3.style.textDecoration = 'none';
  } else {
    $button3.style.textDecoration = 'line-through';
  }
});
이런 방식에서 버튼이 굉장히 많이 추가되었을떄, 유연하게 대응하기 힘들어진다. 코 드의 양도 늘어나고, 한눈에 알아보기도 쉽지 않다.
이제 toggleButton이라는 버튼으로 추상화를 해보자. 독립적으로 돌아가도록 만들어보 자.
function ToggleButton({ $target, text }) {
  const $button = document.createElement('button');
  let isInit = false;

  this.render = () => {
    $button.textContent = text;
    if (!isInit) {
      $target.appendChild($button);
      $button.addEventListener('click', () => {
        if ($button.style.textDecoration === 'line-through') {
          $button.style.textDecoration = 'none';
        } else {
          $button.style.textDecoration = 'line-through';
        }
      });
      isInit = true;
    }
  };

  this.render();
}

const $app = document.querySelector('#app');
new ToggleButton({
  $target: $app,
  text: 'Button1',
});

new ToggleButton({
  $target: $app,
  text: 'Button2',
});

new ToggleButton({
  $target: $app,
  text: 'Button3',
});
토글 버튼 하나를 만드는데 핗요한 코드가 모두 ToggleButton 함수 안에 위치한다. 이 벤트를 등록하는 것까지 ToggleButton 안에 있어서, ToggleButton은 결국 target만 잘 받는다면, 잘 동작한다.
이렇게 토글버튼에 필요한 것들을 응집력있게 모아둠으로써, 기능이 추가되었을 때 유 연하게 대응할 수 있다.
예를들어
- 3번 클릭할 때마다 alert경고창을 띄우는 요구사항이 새로 생성되었다고 가정해보자 .
처음 작성한 코드에서는, 버튼 3개별로, 따로 버튼 별로 Count를 둬야한다. 이 경우버 튼이 늘어났을 떄, 각 버튼 별로 Count가 너무 많아져 읽기도 구분하기도 힘들고, 읽 기도 어려워진다.
그럼 선언적으로 바꿔서 기능을 추가해보자
먼저 - 3번 클릭할떄마다 alert경고창을 띄워보자!
function ToggleButton({ $target, text }) {
  const $button = document.createElement('button');

  let clickCount = 0;

  this.render = () => {
    $button.textContent = text;
    $target.appendChild($button);
  };

  $button.addEventListener('click', () => {
    clickCount++;
    if ($button.style.textDecoration === 'line-through') {
      $button.style.textDecoration = 'none';
    } else {
      $button.style.textDecoration = 'line-through';
    }

    if (clickCount % 3 === 0) {
      alert('3번 클릭!');
    }
  });

  this.render();
}

const $app = document.querySelector('#app');
new ToggleButton({
  $target: $app,
  text: 'Button1',
});

new ToggleButton({
  $target: $app,
  text: 'Button2',
});

new ToggleButton({
  $target: $app,
  text: 'Button3',
});

new ToggleButton({
  $target: $app,
  text: 'Button4',
});
위의 코드는 버튼 마다 Count를 두지 않아도되서, 더 간단하고 ToggleButton안에 count변수를 두었다. 만약, 주어진 3번클릭할떄마다 경고창을 띄운다라는 요구사항을 특정 버튼에만 쓰려면 어떻게 할까?
이 경우
특정한 일이나 행위를 ToggleButton 밖에서 정의하고, 이를 ToggleButton으로 주입하면 어떨까?function ToggleButton({
$target,
text,
//이 부분을 밖에서 주입받는다
onClick,
}) {
const $button = document.createElement('button');
let clickCount = 0;
this.render = () => {
$button.textContent = text;
};
$button.addEventListener('click', () => {
if ($button.style.textDecoration === 'line-through') {
$button.style.textDecoration = 'none';
} else {
$button.style.textDecoration = 'line-through';
}
if (onClick) {
onClick(clickCount);
}
});
this.render();
}
const $app = document.querySelector('#app');
new ToggleButton({
$target: $app,
text: 'Button1',
//클릭했을 떄 특정 행위를 주입한다.
//3번클릭할때 경고창을 밖에서 주입함
onClick: (clickCount) => {
if (clickCount % 3 === 0) {
alert('3번째 클릭');
}
},
});
new ToggleButton({
$target: $app,
text: 'Button2',
});
new ToggleButton({
$target: $app,
text: 'Button3',
});
new ToggleButton({
$target: $app,
text: 'Button4',
});
다만 위의 코드도 문제가 있다. 버튼의 상태가 textDecoration이 있냐 없냐에 따라 결 정되는데, UI의 상태를 추상화하고 , 해당 상태에 따라 랜더 함수를 통해, 상태의 변 화를 따라가는 방식이 더 좋고, 현명하다!
UI가 상태를 기반으로 랜더링 되게 만든다!
먼저 ToggleButton 컴포넌트에서 상태를 나타내보자.
this.state = {
  clickCount: 0,
  toggled: false,
};

//이전상태를 새 상태로 갈아끼운다
this.setState = (nextState) => {
  this.state = nextState;
  this.render();
};

this.render = () => {
  $button.textContent = text;
  $button.style.textDecoration = this.state.toggled ? 'none' : 'line-through';
};

$button.addEventListener('click', () => {
  this.setState({
    clickCount: this.state.clickCount + 1,
    toggled: !this.state.toggled,
  });
});
이런식으로 count상태, 토글되었는지 나타내는 상태를 만들고, 상태를 바꾸는 setState를 만든다. 그 후 render함수는 상태에 따라 다른 UI를 반환하고, 클릭했을떄 상태를 setState로 갱신한다.
그럼 새로운 요구사항이 들어왔다면 어떻게 할까?
- 5초 뒤에 토글되야(삭선이 있다면 없게, 없다면 있게!) 한다
function ToggleButton({$target,text,onClick}){
    const $button = document.createElement('button');
    $target.appendChild($button);

    this.state = {
        clickCount:0,
        toggled:false
    }

    this.setState = (nextState) => {
        this.state = nextState;
        this.render();
    }

    this.render = () => {
        $button.style.textDecoration = {
            this.state.toggled ? 'line-through' : 'none'
        }
    }

    $button.addEventListener('click',() => {
        this.setState({
            clickCount:this.state.clickCount+1,
            toggled:!this.state.toggled
        })
    })

    if(onClick){
        onClick(this.state.clickCount);
    }

    this.render();
}

function TimerButton({$target,text,timer = 3000}){
   const button = new ToggleButton({$target,text,onClick:() => {
        setTimeout(() => {
            button.setState({
                ...button.state,
                toggled:!button.state.toggled
            })
        },timer);
   }});


}


new TimerButton({
    $target:$app,
    text:'3초 뒤에 자동!'
})

new TimerButton({
    $target:$app,
    text:'10초 뒤에 자동',
    timer:1000 * 10
})
마지막 요구사항으로 ButtonGroup을 만들어보자. 버튼을 그룹지어서 한번에 만드는 것 이다.
function ButtonGroup({
    $app,
    //버튼들의 파라미터들
    buttons
}){

    let isInit = false;
    const $group = document.createElement('div');
    this.render = () => {
        if(!isInit){
            buttons.forEach({type,...props}) => {
                if(type === 'toggle'){
                    new ToggleButton({
                        $target:$group,
                        ,...props
                    });
                }
                else if(type === 'timer'){
                    new TimerButton({
                        $target:$group,
                        ...props
                    });
                }
            }
            $target.appendChild($group);
            isInit = true;
        }
    }

    this.render();
}

new ButtonGroup({
    $target:$app,
    buttons:[
        {
            type:'toggle',
            text:'토글 버튼',
        },
        {
            type:'timer',
            text:'타이머 버튼',
            timer:1000
        }
    ]
})
컴포넌트 방식으로 생각하기
사실 이렇게 선언형으로 무엇을 하고자 하는지 생각해서 컴포넌트를 짜 본적이 없는것 같다. 항상 컴포넌트를 짤 떄, 선언형으로 무엇을 하고자 하는지 생각해야겠다.!.